Skip to main content
Advanced Search:
+ Add Machine
Fusion Pro
Fusion Edge
Fusion Maker
Fusion Galvo
Zing
Mini / Helix
Fibermark
Fusion / Fusion M2
Legend 36EXT
Legacy Systems
+ Add Category
Getting Started
Usage and Operation
Service and Repair
Search
Laser Machines
Fusion Pro
Fusion Edge
Fusion Maker
Fusion Galvo
Mini / Helix
Zing
FiberMark
Fusion / Fusion M2
Legend 36EXT
Legacy
Support
Submit a Ticket
Order Status / Submit Payment
Shop Parts & Accessories
Resources
Owner's Manuals
Software & Firmware Downloads
Register Your Machine
Training
Remote Session
Submit a Ticket
Results Found: 0
Was this helpful?
Yes
No
Submit
Cancel
Thanks for your feedback!
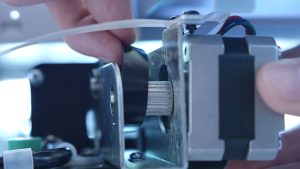
X-Axis Carriage Install – Zing
How do I remove my lens carriage on the Epilog Zing?
X-Axis
:
Related Articles:
X-Motor Replacement
X-Axis Belt Install - Zing
X-Axis Assembly Replacement
Lens Carriage Rollers
How to Replace the Home Switch (XY PCB) - Zing
Related Categories:
Accessories
Cameras
Chassis
Control / Circuit Boards
Laser Source
Optics
Power / Electrical
Table / Grid
Troubleshooting
Y-Axis
Zing
Service and Repair
Introduction
Introduction
|
Introduction
Lens carriage removal procedure in the Zing engraver.
Was this helpful?
Yes
No
Submit
Cancel
Thanks for your feedback!
ID:
KA-01077
Date:
09/26/2024
Attachments:
10G-Lens Carriage
Continue Your Laser Journey
Revisit a past lesson or move ahead to discover what’s next!
X-Motor Replacement
Replace the motor that moves your machine's laser head along the x-axis assembly.
Next Lesson